

Part 1: The Arrival Walkthrough
Part 1: The Arrival of Silent Hill: Townfall sees Simon Ordell arrive at the docks of St. Amelia, discovering an abandoned town shrouded in fog with strange phenomena lurking within. This walkthrough covers every step of Part 1, including puzzle solutions, collectible locations, and enemy avoidance strategies. The game is played entirely in first-person perspective, immersing you in the horror.
Getting Started - The Docks
As an unknown male voice beckons Simon to return to the town and "put some things to rest," Simon breaches up out of the water and onto the dock. After catching his breath, Simon notices the hospital ID band on his wrist and the IV line in his arm, the latter causing him immense pain when touched. Hearing a noise on the path overhead, he sets out to investigate.
Once in control, go up the steps ahead of you and loop around to the left. Continuing forward past the first street light, you will reach a locked gate preventing you from progressing. Take the nearby stairs down on the right side of the path (when facing away from the gate).
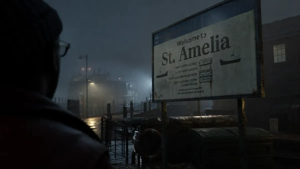
Head straight at the bottom and you will find a ladder on the wall at the far end. Climb up and continue on. Turn left at the top and follow the path until you trigger a cutscene in which the St. Amelia sign is revealed after a tarp is blown off. Check the door of the small building to your right to read the Boat Tour Cancelled Notice document.
Reaching the Town Square
Head toward the house with the flashing street light and turn left down the road. At the far end, turn right and a red flare will shoot into the sky nearby, dousing the area in red light. Up the two sets of steps is a locked gate. Approaching it allows you to spot a mysterious man walking up the street ahead of you.
Go back down the second set of steps and turn left down an alley, passing many For Sale signs. As the path opens back up, go up the steps immediately to your left and turn left when you reach the main road with the pharmacy ahead. Keep going forward and you will spot the red-illuminated fog between two buildings. Walk into the fog to trigger a cutscene where Simon arrives in the town square.
After observing the Heart of St. Amelia centrepiece, pick up the St. Amelia Shorefront Map.
The Phone Booth Puzzle
Go to the opposite side of the square and you will hear a phone ringing. Enter the phone booth and examine the Your Local Services poster for three phone numbers:
- 900 - Emergency Services
- 010 - Operator
- 100 - Save Yourself
Interact with the ringing phone to answer it, but no one is there. Pick it back up and manually input the numbers. To progress, you need to input 100 specifically.
A cutscene follows with the mysterious man who promises to protect Simon but needs his help. After a crippling pain overtakes Simon, the save screen appears. To save the game, find and use a telephone booth, ringing 100 once inside.
The Hospital Cell Escape
Stumbling out of the booth, Simon sees an older man covered in blood with a tube descending from the sky funneling fluid into his mouth. After Simon removes the tube, everything goes dark. The man tells Simon to "find her" before Simon is teleported to a strange cell.
Interact with the lock on the door and open it. Go straight down the corridor and turn left at the junction. As banging and screaming erupt around you, run to the far end and crouch underneath the debris.
Stand back up and curve around to the right where you will find a metal grate on the wall. Crouch down and interact with it, sliding it open to reveal a slope leading into a water-logged area. Follow the right-most passage as it twists and turns until you emerge into an area where you can stand. Head around the next corner, squeeze through a gap, and crouch under pipes in the corridor to reach the far side. Climb the ladder and continue until you reach the 204 door.
Room 204 Puzzle
A cutscene triggers where Simon grabs the shaking door handle and emerges into a hotel room. A woman's voice speaks from the CRTV device. He picks it up and she pleads with him to "come back" to her. The door slams behind him.
With the CRTV in your possession, hold the device (L1) and adjust the tuning so the white bar overlaps with the yellow pips. When the fine tuning bar appears, hit Store Signal as the yellow diamond overlaps with the yellow and black rectangle.
The first pip shows the woman speaking and highlights the lock mechanism on the door. The second pip shows a calendar with the 18th zoomed in on, and the full calendar with the first month (January) circled.
Inspect the Room Service Card on the desk - it is the 1996 menu. Assemble the correct code:
- Outer ring: 18
- Middle ring: January
- Inner ring: 1996
Lock in the code to unlock the door. Grab the Hotel Room Note and Room 204 Key from the bathroom sink counter.
Escaping the Hotel
Use the Room 204 Key on the main door to reveal a caged corridor. At the far end, interact with the elevator button. While waiting, use your CRTV to detect threats - tune the device and follow directional markers to see entities through the screen. Several will appear, but stay still by the elevator doors while scanning and you will remain safe.
Once the elevator arrives, go inside. A large monster appears in the doorway as the doors close. A jolty elevator ride brings you to the Haldane Hotel lobby. Grab the Hotel Reception Notice behind the counter, then interact with the front doors to exit. Simon emerges back into the town square, now littered with protest signs, as gargantuan tentacles hang from the fog above.
Zoe's House
After the title sequence, grab the Vigil & Protest Flyer from the bench by the centrepiece. The CRTV signals will suggest the next direction to head. Head past the telephone booth and down the road. On the right side, look for a loose strand of bunting beside an alleyway. Take a right at the far end to find Zoe's house.
Inside the kitchen, open the drawer to find a Flashlight (No Batteries). Cross into the room on the other side of the hall to find the Hand Delivered Letter on the table. Go upstairs and enter the first door on the left to find Gauze in the bathroom cabinet. In the en suite, collect the Organ Transplant Card.
In the room opposite, open the drawer to retrieve AA Batteries. Combine these with the Flashlight in your inventory to create a working flashlight.
Head back downstairs and crouch in the stairway to find the power box and Power Card Credit Guide. Power Cards are sold at the newsagents, so exit the house.
The Newsagent
The newsagent front door is locked, so go around the back. Head left and pass under The Mariner sign. You will be tutorialized on peeking and hiding. Use the CRTV to track the creature. When it runs to the far corner, crouchwalk to the roll cage and use it as cover, looping around as the creature moves away.
Slip into the newsagent through the open back door. On the counter find a Plank weapon and the Newsagents Note. Open the cash register behind the counter to retrieve the Prepaid Power Card. Unlock the front door lock and exit carefully, using the CRTV to track the creature.
Restoring Power at Zoe's House
Back inside Zoe's house, interact with the power box under the stairs. Follow these steps:
- Insert the Prepaid Power Card in the slot
- Cycle option to Card Credit using Button A (press twice so it reads "Card Credit")
- Press Button B to apply credit
- Push the Master Power Switch
With power restored, go to the living room computer and refresh the inbox. Read the three emails, especially "For Attending..." which reveals you need the first and last 3 digits of the ET Code.
Transplant Box Puzzle
Examine the Organ Transplant Card in your inventory. The ET Code on the right is HFSOPCS Y015. Taking the first and last three digits gives 956 and 133.
Return to the transplant box on the kitchen table: - Left padlock: 956 - Right padlock: 133
A cutscene triggers where Simon retrieves Zoe's bloodied nurse lanyard for the Shorefront Family Clinic.
Shorefront Family Clinic
Use the CRTV to find the signal directing you to the clinic. Exit the front door and head to the town square. A creature will be in the left-hand street where the clinic entrance is. Use the CRTV to wait for it to walk away, then slip down the street.
Examine the flyer by the clinic door for the Shorefront Family Clinic Notice. Use Zoe's Lanyard on the card reader to raise the shutters. Hide behind the garbage container when the creature is attracted by the noise.
Inside the clinic, search the offices: - Dr. Stevenson's office: Gauze in medkit, Note on Patient Records in desk drawer - Dr. Harford's office: Empty IV Bag in desk drawer, Gauze on counter - B. McMillan's office: IV Fluid on bottom shelf of metal cabinet - Zoe's office: Resignation Letter, Scalpel from medkit on desk
Read the two emails on Zoe's computer. Use the post-it note code 2896 on the reception keypad. Inside, play the answering machine message from the Pharmacist about a prescription.
The Pharmacy Puzzle
Exit the clinic and head to Main Street. At the Pharmacy, use the Scalpel on the rusted door to cut through a skin-like slab behind the metal hatch.
In the back room, grab a First Aid Kit from the metal cabinet. Interact with the VHF transceiver to tune your CRTV into a radio transmission. This requires adjusting the CRTV angle and calibrating color channels (toggle between each color until they fit within the white rectangles).
Once calibrated, the CRTV shows clips of health posters around the pharmacy. Find the clues:
- Handwashing poster (bathroom area): 6 fingers visible
- "5 Steps for Safer Medicine" poster (downstairs): 5 steps
- Antibiotics poster (pinboard in back room): 9 tablets in packet
- Consultation poster (main room, left of front door): device points to 3
Check the CRTV for the correct order. The code is 6539. Use this on the combination lock on the locker in the backroom to get the Prescription Dosage Error Note.
Jess's House and St. Amelia Park
Go right of the centrepiece and cut through flesh on the rusted gate to St. Amelia Park. Unlock the white wooden gates in the lower left corner for shortcuts. Collect Strange Postcard 2 in the alley behind building number 3. Find Strange Postcard 1 in the Video Star store near the concrete wall.
Continue through the park, opening white fences for shortcuts. Find Strange Postcard 3 on the concrete wall at the dead end. Use the CRTV to navigate past two patrolling creatures.
Read the Jess's Door Note to learn the back door key is at number 16. Enter building 16 (blue doorway) and search the apartments: - Apartment 0/1: First Aid Kit in bathroom, blue lockbox on coffee table - Apartment 1/2 (upstairs): Gauze in bathroom, Feeling Sick Note, 21 Farrow St. - Back Door Key on living room table, Strange Postcard 4 in bedroom
Use the back door key on Jess's house. Inside, find the Task Assignment document, Lockbox Key in kitchen drawer, Jess Legal Advice in apartment 0/1, and the Broken Stethoscope on the bedroom bed.
Clinic Scales Puzzle - Part 1 Complete
Return to Zoe's office at the clinic. Place the three items on the weighing scales:
- Left scale: Broken Stethoscope
- Center scale: Dosage Error prescription bag
- Right scale: Zoe's Lanyard
A cutscene triggers with flickering lights and a looping video of Zoe on the CRTV. Part 1: Arrival is complete.
Tips for Part 1
- Always use your CRTV to track enemy positions before moving through areas
- Save at every phone booth you encounter
- The flashlight is essential for dark areas - get the batteries from Zoe's house as soon as possible
- Unlock wooden gates in St. Amelia Park early to create shortcuts for later traversal
- Weapons are scarce - use stealth and distraction whenever possible
- The CRTV signals guide you toward your next objective when you are stuck